文章目录
- 1. 前言
- 2. gdbserver 远程调试
- 2.1 准备工作
- 2.1.1 准备 `客户端 gdb` 程序
- 2.1.2 准备 `服务端 gdbserver`
- 2.1.3 准备 被调试程序
- 2.2 调试
- 2.2.1 通过网络远程调试
- 2.2.1.1 通过 gdbserver 直接启动程序调试
- 2.2.1.2 通过 gdbserver 挂接到已运行程序调试
- 2.2.2 通过串口远程调试
- 2.2.2.1 通过 gdbserver 直接启动程序调试
- 2.2.2.2 通过 gdbserver 挂接到已运行程序调试
- 3. 参考资料
1. 前言
限于作者能力水平,本文可能存在谬误,因此而给读者带来的损失,作者不做任何承诺。
2. gdbserver 远程调试
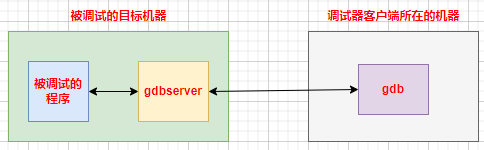
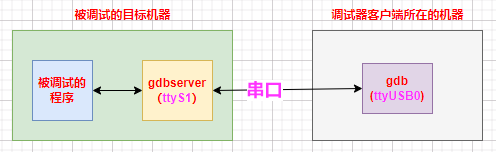
GDB 远程调试同时需要 服务端 gdbserver 和 客户端 gdb 两个程序。本文以 ARM32 嵌入式设备内程序的调试为例,对 GDB 远程调试方法进行说明。
先对 服务端 gdbserver 和 客户端 gdb 连接拓扑做一个梗概描绘:
2.1 准备工作
2.1.1 准备 客户端 gdb 程序
客户端 gdb 通过和 服务端 gdbserver 的交互,对运行于目标机器的程序进行调试。笔者使用 Ubuntu 系统作为调试客户端的宿主机,即 客户端 gdb 运行于 Ubuntu 下。
笔者测试使用的嵌入式设备 SDK 的交叉编译工具链已经包含了 客户端 gdb 程序,无需额外准备:
$ arm-linux-gnueabihf-gdb --version
GNU gdb (Linaro GDB 2016.02) 7.10.1.20160210-cvs
Copyright (C) 2015 Free Software Foundation, Inc.
License GPLv3+: GNU GPL version 3 or later <http://gnu.org/licenses/gpl.html>
This is free software: you are free to change and redistribute it.
There is NO WARRANTY, to the extent permitted by law.  Type "show copying"
and "show warranty" for details.
This GDB was configured as "--host=x86_64-unknown-linux-gnu --target=arm-linux-gnueabihf".
Type "show configuration" for configuration details.
For bug reporting instructions, please see:
<https://bugs.launchpad.net/gcc-linaro>.
Find the GDB manual and other documentation resources online at:
<http://www.gnu.org/software/gdb/documentation/>.
For help, type "help".
Type "apropos word" to search for commands related to "word".
如果读者的交叉编译工具链没有包含 gdb,在 Ubuntu 下可通过命令安装适用于多架构平台的 gdb 客户端程序:
sudo apt-get install gdb-multiarch2.1.2 准备 服务端 gdbserver
gdbserver 运行于被调试的目标机器,在本文中目标机器指 ARM 嵌入式设备。笔者是通过 buildroot 构建的 gdbserver,不想使用 buildroot 的读者,可自行查阅相关资料进行 gdbserver 的构建。
构建好 gdbserver 后,将其拷贝到目标机器。笔者是将其拷贝到目标机器的 /usr/bin 目录,这样可以不用指定路径运行。
2.1.3 准备 被调试程序
/* test.c */

#include <unistd.h>

int main(void)
{
	while (1)
		sleep(5);

	return 0;
}编译,然后将测试程序 test 拷贝到目标机器:
$ arm-linux-gnueabihf-gcc -o test test.c2.2 调试
2.2.1 通过网络远程调试

2.2.1.1 通过 gdbserver 直接启动程序调试
首先,在目标机器(本文是指 ARM32 嵌入式设备)上运行命令:
# gdbserver :2345 test
Process test created; pid = 440
Listening on port 2345然后,在调试器客户端机器(本文是指 Ubuntu)上运行下列命令:
$ arm-linux-gnueabihf-gdb
GNU gdb (Linaro GDB 2016.02) 7.10.1.20160210-cvs
Copyright (C) 2015 Free Software Foundation, Inc.
License GPLv3+: GNU GPL version 3 or later <http://gnu.org/licenses/gpl.html>
This is free software: you are free to change and redistribute it.
There is NO WARRANTY, to the extent permitted by law.  Type "show copying"
and "show warranty" for details.
This GDB was configured as "--host=x86_64-unknown-linux-gnu --target=arm-linux-gnueabihf".
Type "show configuration" for configuration details.
For bug reporting instructions, please see:
<https://bugs.launchpad.net/gcc-linaro>.
Find the GDB manual and other documentation resources online at:
<http://www.gnu.org/software/gdb/documentation/>.
For help, type "help".
Type "apropos word" to search for commands related to "word".
(gdb) target remote 192.168.3.8:2345
Remote debugging using 192.168.3.8:2345
Reading /root/test from remote target...
warning: File transfers from remote targets can be slow. Use "set sysroot" to access files locally instead.
Reading /root/test from remote target...
Reading symbols from target:/root/test...done.
Reading /lib/ld-linux-armhf.so.3 from remote target...
Reading /lib/ld-linux-armhf.so.3 from remote target...
Reading symbols from target:/lib/ld-linux-armhf.so.3...(no debugging symbols found)...done.
0xb6fd7a00 in _start () from target:/lib/ld-linux-armhf.so.3
(gdb)在客户端宿主机(本文指 Ubuntu)启动 arm-linux-gnueabihf-gdb 后,通过命令 target remote 192.168.3.8:2345 连接到目标机器。其中,192.168.3.8 是目标机器的的 IP。
这时候,目标机器(本文是指 ARM 嵌入设备)会输出 gdb 客户端连接的消息 Remote debugging from host 192.168.3.168 :
# gdbserver :2345 test
Process test created; pid = 440
Listening on port 2345
Remote debugging from host 192.168.3.168
到此,就可以通过 gdb 在客户端宿主机(本文指 Ubuntu),调试目标机器(本文是指 ARM 嵌入设备)的 test 程序了。
2.2.1.2 通过 gdbserver 挂接到已运行程序调试
如果 test 已经运行,可以通过 attach 方式启动 gdbserver,挂接到 test 程序进行调试。
先在目标机器(本文是指 ARM32 嵌入式设备)上启动 test 程序,放入后台运行:
# ./test &
# ps -ef | grep -v grep | grep "test"
  445 root     ./test
将 gdbserver 挂接到 test 进程:
# gdbserver --attach :2345 445
Attached; pid = 445
Listening on port 2345在客户端宿主机(本文指 Ubuntu)启动 arm-linux-gnueabihf-gdb,然后通过命令 target remote 192.168.3.8:2345 连接到目标机器调试程序:
$ arm-linux-gnueabihf-gdb
GNU gdb (Linaro GDB 2016.02) 7.10.1.20160210-cvs
Copyright (C) 2015 Free Software Foundation, Inc.
License GPLv3+: GNU GPL version 3 or later <http://gnu.org/licenses/gpl.html>
This is free software: you are free to change and redistribute it.
There is NO WARRANTY, to the extent permitted by law.  Type "show copying"
and "show warranty" for details.
This GDB was configured as "--host=x86_64-unknown-linux-gnu --target=arm-linux-gnueabihf".
Type "show configuration" for configuration details.
For bug reporting instructions, please see:
<https://bugs.launchpad.net/gcc-linaro>.
Find the GDB manual and other documentation resources online at:
<http://www.gnu.org/software/gdb/documentation/>.
For help, type "help".
Type "apropos word" to search for commands related to "word".
(gdb) target remote 192.168.3.8:2345
Remote debugging using 192.168.3.8:2345
Reading /root/test from remote target...
warning: File transfers from remote targets can be slow. Use "set sysroot" to access files locally instead.
Reading /root/test from remote target...
Reading symbols from target:/root/test...done.
Reading /lib/libc.so.6 from remote target...
Reading /lib/ld-linux-armhf.so.3 from remote target...
Reading symbols from target:/lib/libc.so.6...(no debugging symbols found)...done.
Reading symbols from target:/lib/ld-linux-armhf.so.3...(no debugging symbols found)...done.
Reading /lib/ld-linux-armhf.so.3 from remote target...
0xb6e9e134 in nanosleep () from target:/lib/libc.so.6
(gdb)
2.2.2 通过串口远程调试
2.2.2.1 通过 gdbserver 直接启动程序调试
在目标机运行命令:
gdbserver /dev/ttyS1 test其中,/dev/ttyS1 为目标机上和客户端宿主机连接的串口设备对象。
在客户端宿主机运行命令:
$ arm-linux-gnueabihf-gdb
[......]
(gdb) target remote /dev/ttyUSB0其中,/dev/ttyUSB0 为客户端宿主机上和目标机连接的串口设备对象。
2.2.2.2 通过 gdbserver 挂接到已运行程序调试
在目标机上依次运行下列命令:
# test &
# ps -ef | grep -v grep | grep "test" ## 查询 test 进程 PID
# gdbserver --attach /dev/ttyS1 445在客户端宿主机运行命令:
$ arm-linux-gnueabihf-gdb
[......]
(gdb) target remote /dev/ttyUSB0
3. 参考资料
[1] Using the gdbserver program
[2] gdbserver(1) — Linux manual page